Showing posts with label Elementary Art. Show all posts
Wednesday, December 9, 2015
Third Grade Bonsai Trees
Third grade has been working on bonsai trees and pots throughout the first semester. The project began with making coil pots and glazing them. Once that part was completed students created 3D wire and pipe cleaner tree sculptures. To top it off students added leaves made from tissue paper.
Monday, November 2, 2015
Third Grade Sakura
Third grade has been diligently working on creating clay bonsai pots, first designing the pot, then sculpting it out of clay and finally glazing their fired projects. Well while the clay was drying and being fired in the kiln we had enough time for this brief little project.
Students were introduced to one of the most famous Japanese icons, the cherry blossom tree or sakura.
We discussed the importance of the tree in Japanese culture and looked at images of Japanese cherry blossom viewing parties. Then students created these neat little cherry tree branch paintings.
To start out the background was created using an analogous color scheme (three colors next to each other on the color wheel) out of chalk pastel. Then the branch was created by blowing around india ink with a straw and the flowers were made with dots of red and white paint.
A quick little lesson that introduced students to another color scheme and another piece of Japanese culture.
Students were introduced to one of the most famous Japanese icons, the cherry blossom tree or sakura.
Miharu Takizakura Tree in Fukushima
Cherry Blossom Viewing Party
To start out the background was created using an analogous color scheme (three colors next to each other on the color wheel) out of chalk pastel. Then the branch was created by blowing around india ink with a straw and the flowers were made with dots of red and white paint.
A quick little lesson that introduced students to another color scheme and another piece of Japanese culture.
Monday, October 12, 2015
Japanese Bedrooms
Second grade recently finished up making paper bedrooms. As a class we looked at typical Japanese architecture and tried to notice similarities with all the images. Some things students noticed was the appearance of shoji (Japanese sliding screens) and tatmi mats (a type of rug usually made of rice straw).
Students were then asked to design their very own Japanese room, making sure to include the tatami mat and shoji screen. These little dioramas were made entirely from paper! On the last day of the project students were introduced to the ancient art of origami.
Wednesday, September 30, 2015
The Great Wave
First graders began our exploration of Japan by looking at one of the most recognizable pieces of artwork from that country, The Great Wave (of Kanagawa). aka Hokusai's Wave.
For those interested in learning more abut The Great Wave click here (an enthralling BBC report).
As for the first graders we took this picture as an opportunity to discuss the term landscape. Now the first graders can tell you landscape can mean either an artwork depicting areas of land or the particular orientation of an artwork.
Students drew their own versions of The Great Wave and then painted them using cool colors for the water/land and warm colors for the sky.
Thursday, February 5, 2015
Canopic Jars
So these beauties were started wayyyyyy back in December before holiday break, they were finished up upon our return in January and I'm finally getting around to posting them. So this was quiet the project.
This project went along with our Ancient Egyptian unit. The fourth graders looked at canopic jars and discussed the uses and the reason behind the animal heads on each jar. Then students brainstormed ideas for their very own canpoic jar. The next several classes were spent building up the form around a yogurt cup with newspaper, masking tape and paper mache paste. This part really stretches some students thinking, having to transfer a 2D drawing to a 3D sculpture.
After weeks of building their creations it was finally time to paint. My students simply used tempera paint which they then covered with a paint on clear acrylic sealer to prevent the paint from chipping off.
Since wrapping up Ancient Egypt we have zoomed forward thousands of years to look at astronauts and outer space with our next art with science unit.
This project went along with our Ancient Egyptian unit. The fourth graders looked at canopic jars and discussed the uses and the reason behind the animal heads on each jar. Then students brainstormed ideas for their very own canpoic jar. The next several classes were spent building up the form around a yogurt cup with newspaper, masking tape and paper mache paste. This part really stretches some students thinking, having to transfer a 2D drawing to a 3D sculpture.
After weeks of building their creations it was finally time to paint. My students simply used tempera paint which they then covered with a paint on clear acrylic sealer to prevent the paint from chipping off.
Since wrapping up Ancient Egypt we have zoomed forward thousands of years to look at astronauts and outer space with our next art with science unit.
Friday, January 16, 2015
Weaving Crocodiles
First grade has been working on a project that has many, many steps and took just as many class periods to finish. Now they are finally complete and the results are totally worth the wait. To finish up our Ancient Egyptian theme students have been making weaving crocodiles. The idea for this project came from art teacher Cassie Stephens. You can check out her blog here.
First students learned about the ancient art of weaving, how it is done, what it could be used for etc. We also learned Ancient Egyptians used weaving all the time! Students decorated their strips of paper with patterns and designs cut out from colored construction paper. After the strips were decorated students assembled the weaving.
After the weaving was finally complete, which was a big project all on its own we began to create the different body parts to turn our weaving's into crocodiles. Students cut out tails, which we stamped with green paint and cardboard. We also created the crocodiles mouth, which we made into puppet mouths. This added an extra day to the lesson and was a tad difficult but the students love the fact that they can make their crocodiles mouth open and close.
First students learned about the ancient art of weaving, how it is done, what it could be used for etc. We also learned Ancient Egyptians used weaving all the time! Students decorated their strips of paper with patterns and designs cut out from colored construction paper. After the strips were decorated students assembled the weaving.
After the weaving was finally complete, which was a big project all on its own we began to create the different body parts to turn our weaving's into crocodiles. Students cut out tails, which we stamped with green paint and cardboard. We also created the crocodiles mouth, which we made into puppet mouths. This added an extra day to the lesson and was a tad difficult but the students love the fact that they can make their crocodiles mouth open and close.
Monday, December 1, 2014
Hieroglyphic Name Design
Third grade recently finished these really cool Egyptian Name Designs. Students were introduced to the Ancient Egyptian language and we discussed the artistic choices the Egyptians made every time they wrote, since it was a picture based language. Once students had a handle on it they drew his/her name inside a pre-made cartouche (basically a fancy Egyptian oval). After that students were introduced to the idea of foil relief. Each student took his/her name design and traced it onto a piece of metal foil. After all the tracing and pressing to get their designs in relief they colored it with sharpie markers. Then witha little black spray paint and steel wool we have nice distressed tin name designs.
The second step of the project was creating the frame. We discussed complimentary colors (colors that across from each other on the color wheel). Each student drew a design around their frame which they painted with a pair of complimentary colors. Students were amazed at how many different colors one could get by simply mixing different amounts of their complimentary colors together.
Sunday, November 9, 2014
Elementary Egypt
Greetings everyone.

So for the past several weeks my students have been learning all about Ancient Egypt. I find everything from this time period so fascinating and it would seem my students do as well. They are full of insightful questions and numerous students have brought in Egyptian books, statues etc from home to share with me!
Anyways at the start of this unit I decided I wanted to dress up the front of the room to fit the theme. I looked at my twelve windows that connect with the hall and was struck with the idea to put a mural in those windows. I mean how long could it possibly take? Two weeks later I finally got around to finishing the mural and hanging it the windows, plus sprucing up Rib's tank and table area with Egyptian items. Overall I was pretty pleased and the kids really dig the area.
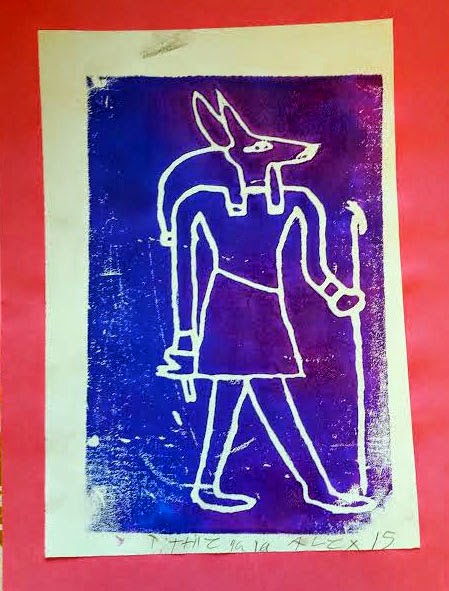
Now for a glimpse at one of the many cool Egyptian projects done by my students. The fourth graders were introduced to the drawing style of the Ancient Egyptians. We learned that the Egyptian artists followed certain rules when drawing the human figure. They were taught to draw using a grid system that led to the figures always having what Egyptians deemed the right proportions. They also chose to draw different parts of the body from different angels. Students then used grid paper to draw the way Ancient Egyptians did including animal heads. Once students completed their drawings we transferred the images to Styrofoam plates for printmaking.


So for the past several weeks my students have been learning all about Ancient Egypt. I find everything from this time period so fascinating and it would seem my students do as well. They are full of insightful questions and numerous students have brought in Egyptian books, statues etc from home to share with me!
Anyways at the start of this unit I decided I wanted to dress up the front of the room to fit the theme. I looked at my twelve windows that connect with the hall and was struck with the idea to put a mural in those windows. I mean how long could it possibly take? Two weeks later I finally got around to finishing the mural and hanging it the windows, plus sprucing up Rib's tank and table area with Egyptian items. Overall I was pretty pleased and the kids really dig the area.
Now for a glimpse at one of the many cool Egyptian projects done by my students. The fourth graders were introduced to the drawing style of the Ancient Egyptians. We learned that the Egyptian artists followed certain rules when drawing the human figure. They were taught to draw using a grid system that led to the figures always having what Egyptians deemed the right proportions. They also chose to draw different parts of the body from different angels. Students then used grid paper to draw the way Ancient Egyptians did including animal heads. Once students completed their drawings we transferred the images to Styrofoam plates for printmaking.
The following class was spent reviewing printmaking. We talked about the tools used and the procedures we needed to follow in order to make the printing go smoothly. . . as smoothly as it can with 25 fourth graders. Students then got to work making two practice prints. On this first day of printing I only let the students use black ink.
The last two classes were spent making colored prints. Some using only one color and then eventually using two colors on one print. The students really enjoyed getting to choose what two colors they wanted to use together. Once all the printing was finished I had students choose his/her two best prints and mat them. They all came out super awesome.

Thursday, October 23, 2014
Name Design Skeletons
Fourth grade recently finished up a project where they used his/her name in a clever way. First we learned about symmetry and then students wrote out his/her name on a long piece of white paper folded in half. It was important that they were sure to keep all the letters of his/her name connected. This way when students cut out his/her name all the letters remained connected. It was also important that one point of every letter was touching the folded edge of the paper, so when students unfolded the design they ended up two copies of his/her name connected. This creates a mirror image of their names, a symmetrical design.
This design coincidentally looks a lot like skeleton bodies. So in theme with all things creepy and October that exactly what we turned them into. Students glued the name design onto black paper then added limbs and a head. Viola! Tons of skeletons each with their own personality.
Sunday, October 19, 2014
Third Grade Buildings
Third grade finished up these really cool cityscape drawings before starting our fall projects. We talked about creating a realistic city by making sure our buildings overlapped as well as adding tons of details on the buildings themselves. Students used ultra thin Sharpie markers which really allowed them to create these tiny little masterpieces. Once the students finished up their cities the carefully cut out any extra paper along the top. Finally we rolled the drawings up to create a type of 3-D city.
Subscribe to:
Posts (Atom)


